
This tutorial is kindly provided by the plugin developer. Please note that some of the VamTam themes come with Revolution Slider or VamTam Slider, so make sure you are reading the right guide :)
The full plugin's documentation is available here: https://support.kreaturamedia.com/docs/layersliderwp/documentation.html
Setting up the Layered Slider
We always recommend importing the demo content. If you have done so you would have imported the sample sliders that come with the theme and replicate the one on the demo website. You can use these sliders as a starting point for your own website. The "sample sliders" are well designed and complex sliders. If you are not yet familiar with the slider and theme options it is a must to use them.
Layered slider is powerful and complex parallax slider. It gives you unlimited opportunities to create slides with many sub layers with different animation.
Please note that the Layered Slider is a plugin and have its own option panel found in the main left side navigation menu - Layered Slider WP
Managing sliders
Add a new slider: Press the Add New Slider button located on the top of the LayerSlider admin page. The plugin should navigate to the slider builder interface after you've entered the name of your new slider.
Modifying a slider: Click on the name of the slider or the "Edit" button to jump to the edit page. In the redirected page you can find more info about modifying a slider with this contextual help menu.
Duplicating sliders: Hover over your slider and click on the icon to reveal slider actions, then select the Duplicate option. This will create an identical copy of the corresponding slider. This feature is useful if you would like to experiment on a slider without changing the original. You can also use this feature to have a base when you want to build a slider with similar settings.
Removing a slider: Hover over your slider and click on the icon to reveal slider actions, then select the Remove option. This will only hide the slider from all pages, but a copy in your database will be preserved as a backup.
Restoring sliders: You can list removed sliders with the filters on top of the page. Click on the restore icon to reinstate your sliders.
Permanently delete sliders: Having hidden backups from previously removed sliders can always be useful. This will not affect your site's performance, thus we don't recommend to permanently delete sliders. However, if you decide to do that, just select the sliders and choose the Delete permanently option in the drop-down list below your sliders.
Merging sliders: If you have slides in different sliders that you would like to use together, you can merge them. Just select the appropriate sliders and choose the Merge sliders as new option from the drop-down list below.
Number of sliders per page: You can find this setting under the Screen Options menu located on the top of the page.
Activating the Slider in Pages/Posts’ Header
Local Settings
You have local slider options that can be found just below the text editor in every page/post.

Troubleshooting
Some of the plugins may interfere with the way slider works. Please deactivate all your plugins, clear your browser cache and see if this fixes the issue.
Inserting Layer Slider to your page
Inserting the slider using the Drag & Drop Builder
You can place your sliders into pages and posts using the Drag & Drop Builder.
1. Click on the button or drag into the editor in order to insert it.
2. Click on the "edit" icon of the Layered Slider element and chose a slider from the one you've already created.
3. Save Element
4. Publish

Inserting the slider with the LayerSlider WP widget
LayerSlider WP supports widgets, so you can place your slider in your front-end page just by a drag n' drop. To do that, navigate to the Appearance menu on your left sidebar and select "Widgets". Grab the LayerSlider WP Widget and drop it into one of your widget area.

Calling the slider from your theme files
Because a slider can be an integral part of your site, you may want to place it into your theme files. There is a PHP function with filtering options which you can call for example from the header.php file of your theme and it inserts your slider into your home page or certail other pages depending on your filtering settings. Here is the function definition:
layerslider ( mixed $sliderID [, string $pages] )
The $sliderID parameter can be found on the plugin page in the slider list view at the first table column.
The $pages parameter is a comma separated list of pages either by name or the ID of the pages. If you are unsure about your page names or IDs, look at their URL, it is the last component.
There is a special page name, the "homepage", with you can filter LayerSlider WP to display the slider on your home page. It is also works if you set up a static custom page instead of the default post listing.
The following examples are all valid, you can use either of these, you can even mix them on your own needs:
<?php layerslider(1); ?> // Displays the first slider on every page
<?php layerslider(1, 'homepage'); ?> // Displays the first slider only on your home page
<?php layerslider(1, 'my-custom-post-title'); ?> // Displays the first slider on a custom page by name
<?php layerslider(2, '1369'); ?> // Diplays the second slider on a custom page by ID
<?php layerslider(3, 'homepage,about-us,1234'); ?> // Displays the third slider on multiple pages
It is important when you want to insert a slider to check its ID on the LayerSlider WP slider list page. When you removes some sliders, their IDs won't be reindexed and the sequence may broke up. This is important to keep persistent your sliders preventing unwanted changes on the already inserted ones.
Export/Import
Exporting your sliders
Hover over your slider and click on the icon to reveal slider actions, then select the Export option. This will download a .zip file that you can upload on other sites or use as a backup.
You can also export multiple sliders by selecting them with the checkbox when hovering over them, then choose the Export Bulk Action option below the slider list. Please note, selecting multiple sliders with images can drastically increase the exported file size and could lead import issues on sites with certain server settings.
Importing sliders
At the top of the LayerSlider home screen press the Import Sliders button. This will open a modal window where you can choose a previously exported .zip or .json file to be imported by pressing the Import button. For additional information, please read the details in the modal window.
Troubleshooting
- Check the
LayerSlider -> System Statusmenu on your WP admin sidebar to identify potential issues you might have on your site. - Importing sliders requires the PHP ZipArchive extension installed on your server. To see the availability of this extension, please navigate to
LayerSlider -> System Status. Please contact your web hosting service provider if it's unavailable. - Importing a slider will add its images to your WP Media Library. Larger sliders might have a file size that exceeds the upload limit set on your server. To increase the maximum file size of an upload, please contact your web hosting company.
- Larger sliders with many images could also consume considerably more memory during the import. Most servers should not have any issue with larger sliders, but in some cases you might experience unexpected issues like partially imported sliders.
- If you're experiencing any issue with importing, it's probably linked to memory or execution time limitation on your server. To fix these issues, please contact your web hosting company, since they usually don't offer a way to change these settings remotely.
Using Google Fonts
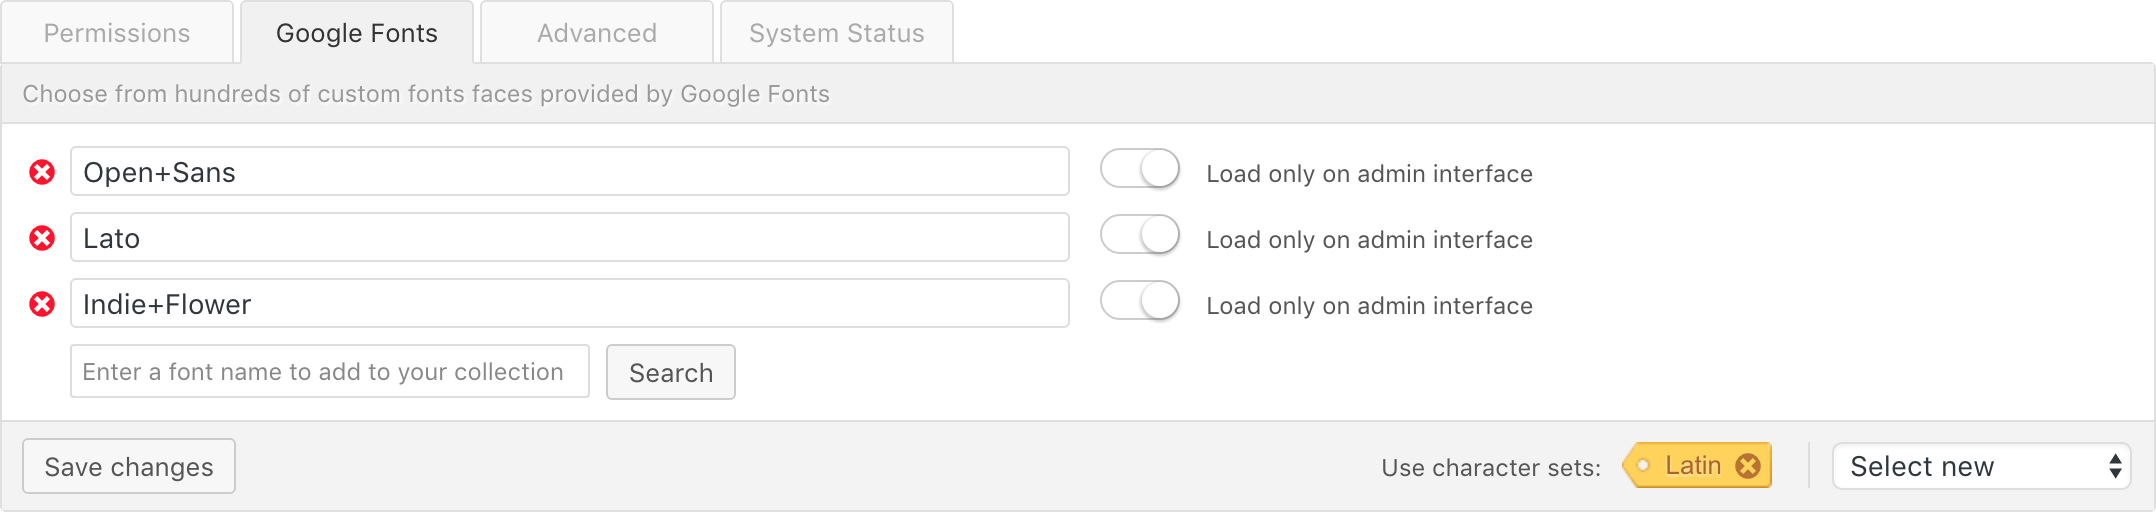
Character set support
By default, LayerSlider uses Latin characters for added Google Fonts. However, it supports Cyrillic, Devanagari, Greek, Khmer and Vietnamese scripts as well.
Themes with Google Fonts Support
Many WordPress themes support Google Fonts. However, it's common that they only load them on the front-end pages and they will appear incorrectly when you would build a slider on the admin interface. To workaround this issue just add them in LayerSlider and check the "Load only on admin interface" option. This way you can avoid loading the same font multiple times on the front-end pages.
Advanced Settings
Under the Advanced tab, you can find many troubleshooting options to workaround common issues you might experience on your site.
Please note, these settings can break your site when used incorrectly, and we don't recommend changing the defaults. These settings might help solving issues caused by 3rd party items, but you should only use them when it's necessary.

Interface Tips
Ordering slides and layers
Your slides and layers are drag n' drop enabled, you can grab them to change their order. To reorder slides you can move the tabs itself; for layers you can use the handle icon on their left side.
Naming your layers
You can assign a unique name for your layers similarly to image editors. It will help you to quickly find the contents you are looking for, and it can improve your overall workflow when you are dealing with complex sliders. You can click on the default name of your layers to enter the one you would like to use.
Selecting layers
You can quickly select a layer just by clicking on it in the WYSIWYG editor. This will opens the layer options in the layer list.
Positioning layers
Just grab a layer and move it around in the editor to set your desired position. For accurate positioning, you can set the left and top values manually under the style tab of the layer. If you want to use percentage values you should set them manually in the layer options.
Real-time preview
If you want to see your slides and layers in action, you can click on the "Enter Preview" button. This will embed a full-featured LayerSlider, just like the ones on your front-end pages. To end the preview session, just click again on this button "Exit Preview" and you will get back the WYSIWYG editor.
If you aren't familiar with the available options, this feature can be useful to test your settings and see which options are responsible for which effect.
Backwards Compatibility
Old slide transitions are deprecated
We've removed the old slide transition settings from the admin interface. Your previously created sliders will continue to work the same as before on the front-end pages, but you won't be able to edit them without choosing from the new slide transitions. Remember, we have some very similar transitions, and you can always modify or build a custom one with the Transition Builder.
Please note, we might completely stop supporting the old slide transition system in the distant future.
Old layer transitions are deprecated
In version 5.0.0 we have new layer transition options that offers more complex and flexible animations. Your earlier sliders will continue to work the same as before without making any changes. The admin interface, however, drops the old options in favor of the new system, and your settings will be converted automatically. Since these new options are working in a different way, your sliders might be slightly different in some rare cases, but it should be super close.
Please note, we might completely stop supporting the old layer transition system in the distant future.
Layout and Responsive Mode
Normal mode:
You have to leave both Responsive and Full-Width settings disabled. You can set the width of the slider in pixels or also in percentage value, you have to set the height of the slider in pixels.
Responsive mode:
You have to enable Responsive and disable Full-Width settings. You have to set both of the width and the height of the slider in pixels. You should know that in responsive mode the given width and height values will be the default starting values of your slider. In this case you can create your slider as you would do it normally but if the slider is resizing, all of your image, embedded video and text layers will be also resized and also repositioned of course.
Full Width mode:
You have to enable Full-Width and disable Responsive setting. You have to set the width to 100% and the height of the slider in pixels. In this mode the slider will be as wide as your browser even if the width of your document is smaller and the height of the slider will be fixed. Layers will be not resized but they will be repositioned if the have percentage values of left and / or top properties.
Responsive + Full Width mode:
You have to enable both Full-Width and Responsive settings. You have to set both of the width and the height of the slider in pixels. In this mode the slider will be as wide as your browser even if the width of your document is smaller and the height of the slider will be always proportional to the original ratio of width / height. Of course layers will be resized and repositioned like in responsive mode.sublayers
To add a name to a sublayer just simply click on its default name and type the new name.
Mobile visibility
To completely disable the Layer Slider WP on low resolutions, please add the code below to the Custom CSS area:
@media only screen and (max-width: 767px) {
#header-slider-container {
display: none !important;
}
}
Change the bolded number to choose when to hide the slider.
Here's a guide: http://support.vamtam.com/support/solutions/articles/200025
Layer options
*Content You can select what kind of content you want to use here. You can use a static image, text, custom HTML or multimedia contents. You can also choose to use dynamic contents from WordPress posts and pages. It supports advanced filtering to get the entries you need, and you include the part you would like to use in a layer such as the title of a post or its featured image.
*Transitions The transition options you can set to customize your layer animation. Move your mouse cursor over the option fields to receive a detailed description about each available settings.
*Link Enter an URL to link layers to other pages. The link behavior can be changed to open it within the current page or on a new tab/window. You can also enter a hash tag followed by a number to link a layer to another slide. For example #3 will switch to the third slide when someone clicks on this layer.
*Style Under this section you can customize the appearance of your layers, such as changing the fonts or setting the size of images. Please read the tooltip messages for more information by hovering over the setting fields. You can also enter custom CSS code if there isn't an option what you are looking for.
*Attributes You can apply standard HTML attributes on layers to make it easier working with them in CSS and JavaScript. It also can be used to collaborate with 3rd party solutions like Lightbox plugins.
Dynamic Sliders from Posts
Using post filters
You can embed dynamic contents from WordPress posts and pages. With using the post filters you can target specific contents to work with in sliders. LayerSlider supports custom post types, tags, categories, and taxonimies to find literally and kind of custom content that themes and plugins may use. To set up the filter you need just select a dynamic layer and click on the "Configure post options" button. In the opening window you can also order the results in your preferred way.
Get the items from results to work with
The post filters are global across slides, but you can select items from the results independently. This allows you to work with posts in a custom order, for example you can retrieve only the even/odd posts from the results. If you want to follow the original order you can choose the "following" option, and LayerSlider will get them automatically.
Using mixed contents
You are not forced to build sliders with dynamic contents only. You can mix them with static slides and layers.
Embedding videos
Embedding videos
LayerSlider works with many media players, but we support YouTube, Vimeo, and (self-hosted) HTLM5 video and audio particularly. We've integrated a lot of features for these solutions such as autoplay, preview image, and pausing the slideshow while contents are playing.
Just choose the "HTML/Video/Audio" layer type to embed multimedia contents. For YouTube and Vimeo videos you need to paste the embed code from their website into the text field. Click on the "Add Media" button to add self-hosted HTML5 video/audio.
Unsupported media players
We can't support every media player since other solutions have their own distinct APIs to control media playback without a universal way. However, users with web development experience can use the LayerSlider API to detect slider events and run custom code to control 3rd party media players. We have a dedicated section for the LayerSldier API in this Help menu for more information.
Translation & Language support
Translating the plugin's user interface without a 3rd party solution
You can find the details about translating the plugin's user interface in documentation that's included in the package you downloaded from CodeCanyon.
Creating multilingual sliders with the qTranslate plugin
qTranslate is the most easiest way to create multilingual sliders in LayerSlider. It is a free and simple plugin that supports a shortcode-like syntax to enter text in multiple languages, so it can display the proper one for your visitors. LayerSlider supports shortcodes and other special syntaxes in the contents of layers, so you can enter something like this to create a multilingual slider:
[:en]English text[:de]German text
The line above will output “English text” if the visitor selected English page and “German text” if the visitor selected German. You can read more about qTranslate on their homepage.
Translating with the WPML plugin
You need a "Multilingual CMS" version of WPML with installed WPML String Translation add-on.
Translating the plugin's user interface:
Navigate WPML -> Theme and plugins localization
Select "Translate by WPML" option in "Select how to localize the theme" section.
In the newly appeared list of plugins, select LayerSlider and click "Scan selected plugins for strings" button.
Under WPML -> String translation menu item, you can now see and edit the texts that LayerSlider uses.
Creating multilingual sliders:
LayerSlider registers translatable contents in layers when you save your work. If you want to translate a previously created slider, you need to re-save it, even if you won't change anything. Once LayerSlider registered the translatable contents, they will appear under the WPML -> String translation menu item in your WP admin sidebar.
Other Features
Deep-linking
Since LayerSlider WP 3.0, you have an option to deep-link slides. This means that you can give a special URL to users that will start LayerSlider with the desired slide. To do that, you have to specify a deeplink name in your Slide Options and use it as a reference in the URL.
For example if you added the name for the deeplink field "surprise", you can reference this slide with the URL "yourdomain.com/yourpage/#surprise".
Event Callbacks
About events in programming languages
Many programming language supports events or notifications. The basic concept is that you can subscribe to these events and the application will send you a notification or run some code when they accour, so you will have a chance to do something you may want to be done in certain points of your program. For example change the site's background when the slider switching slides.
Javascript uses callback functions
In Javascript these events commonly used with callback functions. Instead of sending and receiving notifications, you just pass an anonymous function (also known as blocks in other languages) with your own code to a function or method call as a parameter and the application will execute it when the time has come. LayerSlider uses this kind of event handling.
Events in LayerSlider
So we now by now the technique about event handling, lets see which kind of event LayerSlider has:
cbInit: This event will fire when LayerSlider finished building up the DOM and successfully loaded. If you want to do something with the LayerSlider elements right on the start, you won't be able until LayerSlider has loaded, you have to use this event.
cbStart: Calling when the slideshow has started.
cbStop: Calling when the slideshow is stopped by the user.
cbPause: Fireing when the slideshow is temporary on hold (for example by the "Pause on hover" feature).
cbAnimStart: Calling when the slider commencing slide change (animation start).
cbAnimStop: Fireing when the slider finished a slide change (animation end).
cbPrev: Calling when the slider will change the previous slide by the user via previous button, keyboard navigation, or touch control.
cbNext: Calling when the slider will change the next slide by the user via next button, keyboard navigation, or touch control.
A simple example of a callback function
This simple example will alert the user when LayerSlider changed a slide. To do that we have to pass this function to the cbAnimStop event.
function() {
alert('The slider switched to a new layer!');
}
What's next?
If you want to achieve something with the event callbacks, you probably instrested in our API. Please continue reading with the next section of this document.
LayerSlider API
About application programming interfaces (APIs)
An API is a way to control an application, or get some info about the data which the application is working with. This is a way to two separate application can work together. LayerSlider has an API too, you can control the slider from outside of the application.
API methods
integer: The slider will change to the specified slide. It starts with 1.
next: The slider will change the next layer.
prev: The slider will change the previous layer.
stop: Will stop the slideshow.
start: Will continue or start the slideshow.
data: Will return all the data which LayerSlider is working with. For example you can identify which slide is showing currently, or which one will the next to show.
Using the API
To run one of the above API command, you have to call the LayerSlider jQuery method on the slider element and pass the command as a parameter. WordPress uses IDs on each slider with the word "layerslider_" and the number of the selected slider.
Example: jQuery('#layerslider_1').layerSlider(2);
This will switch to the second slide. If you want to use this with a link, you can use the following code:
<a href="javascript:void(0);" onclick="$('#layerslider').layerSlider(2);">to slide 2</a>
Working with LayerSlider data
The LayerSlider data object is a huge collection with all the information you need. We don't have enough space here to list all of the properties you can work with, you have to check them manually. Here are the most important ones:
curLayer: The current slide DOM element.
curLayerIndex: The current slide index. Starts with 1.
nextLayer: The next slide DOM element.
nextLayerIndex: The next layer index. Starts with 1.
isAnimating: This property returns whether the slider animating or not with boolean.
layersNum: Returns the count of layers (slides).
Callback functions and LayerSlider API
When you request the LayerSlider data object with its API call, you will have the information for that exact moment. When LayerSlider working along, these informations may change or will be outdated. You probably want to use this information in an exact moment, when something just happened, so you have to use the LayerSlider API and the callback events at the same time. To do that, you can use a custom named variable in the callback function header section which will be filled with the data object of LayerSlider. Here is an example of using both with the cbAnimStart event:
function(data) {
alert('The next slide is: ' + data['nextLayerIndex']);
}
A more complex example
Here is a more complex example which show which things you can do with our API. This example implement a custom navigation area for a LayerSlider slider.
You can find this example here.
Transition Builder
About LayerSlider WP Transition Builder
Since version 4.0.0, LayerSlider WP supports various types of slide transitions. The Transition Builder offers you an easy-to-use visual editor to create your own transitions in your own liking.
Transitions created with this editor will automatically appear in list of the available transition when you are editing sliders.
Getting Started
Tooltips
We've included tooltips for every settings, just point over options fields with your mouse to receive addition information. Please read them carefully, it will help you getting started with the available options.
Sample transitions
When you first open the Transition Builder, it will have some samples to help you to get started. We've included some really simple and some more advanced transitions as well to demonstrate the plugin capabilities.
About previews
We wanted to create you a super easy-to-use visual editor, so we included a real-time preview feature. Just click on the "Enter Preview" button, and it will immediately show you the result based on your settings. This way you can easily determine which settings responsible for which effect. Keep playing with the settings and you will discover almost unlimited possibilities.
3D Transitions
Animation steps
The 3D transitions are made up with 3 animation steps to create more-complex transitions with multiple actions. The "animation" step is required, but the "before animation" and "after animation" steps are optional. You can use them to do some preparation before the animation starts or restore back some settings after it is done.
To help you understand what are these steps, here is a simple example:
- Before the animation starts, you may want to scale down columns
- Then rotate them to left
- Finally, you want them to scale up back
If you want a really simple transition, you don't have to use all the steps. In this case, please make sure to untick the "Enabled" checkboxes for the corresponding steps.
Easings
Easings are timing functions of the animations, you can manipulate the objects movement with it.
Troubleshooting
1. Responsive buttons in the slider on low resolution:
When creating the button, make sure that its font-size is set to 1em

Then, in the button's styles tab set the intended initial font-size. After that the button will be resized based on the slider width.
